Wednesday, March 21, 2012

Bringing up the Rear

Well it has been a busy last few months here on the ranch. We have been busy buying our first house and then I have been tied up working on a few off topic cars. Just recently I got back on Mike's modified. The next step in the build was bringing up the rear suspension. The plan was to mount a Model A style spring in front of the rear end. So I started by making the mounts for the rear spring. I started with some 3/8" steel flat bar.
And who says you need fancy tools to build a hot rod? Gotta love that trusty angle grinder!

All welded up plus I added a gusset out 1/4" to strengthen it up.
Then I started building the mounts for the rear ladder bars. Still to be smoothed out at this point.
The rear ladder bars tacked together. We used 7/8" .156" wall DOM steel tubing. I had a local machine shop tap one end of each of the tubes for the clevises we would use to mount them to the ladder bar mounts. You can see I am using the ol' drill bit trick to make sure I have the gussets centered.
Welding up the front mounts for the ladder bars. Sorry about the mess everything is getting packed up for the move. 
Rear mounts all smoothed up and welded in.

The front mounts along with my fancy homemade slip joint yoke.


The body is on!


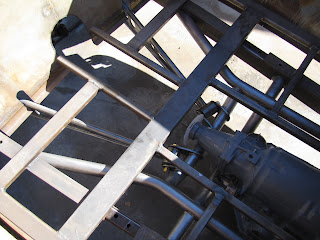
I had to notch the channeled body to clear the new cross member I made


We are going to trailer it back to his house so he can sort out a few things and so I can move into our new place. Next up will be the front end and steering.
It has been a long time since I have made any updates. They are coming soon, but to hold you over in the meantime how about some tunes. This was the A side to The Sonics first single. One of my favorites of all time. Gotta represent the Northwest.

Monday, January 16, 2012

DeSoto Tranny Crossmember

Not a huge update but I have been making some progress on the DeSorta Modified. I have been working on the tranny crossmember and tying in the rear suspension. Mike and I opted to use a crossmember from Speedway with a 6" drop. Once that was cut, positioned, and welded in I bent up some 1.75" tubing that I tied into it. We will then mount the rear ladder bars to these tubes plus it sure strengthens up the frame. It is always fun working with tubing. A lot of different angles going on here. I didn't take any "in progress" photos but here is how it came out.


Wednesday, November 30, 2011

Mike's 1929 DeSoto Modified

This is a 1929 DeSoto modified I am working on for my friend Mike. The car was originally built by Kirk Jones (known to some as Kirk!). The car was never completed and when Kirk decided to build the Legion Special he took all the pieces off of this to run on the Special. He then sold what was left to my friend Mike. Mike brought it to me a few weeks ago to get it rolling. 
 Here is how it looked when we first brought it over to my place
Kirk built the perimeter of the frame consisting of front and rear crossmembers. The front runs a suicide perch. None of the suspension, motor, trans, etc has been mounted yet.
The car was originally set up for an inline six. Mike found this nice 250 Chevy to run and it will be mated to a 350 transmission. 

After figuring out what kind of stance he wanted and getting the motor tacked in its proper place I commenced on making the motor mounts. Mike wanted something simple and this is what I came up with. Here is one side in progress.

And here they are all done 
The left side mount took a little more time to make due to the offset mounts on the motor

All bolted up


Next up is building the tranny crossmember.


Thursday, November 17, 2011

While my tank gently weeps

Finally finished up the tank. You can see what it started out looking like HERE. 
Finished the first of the patches after hammer and dollying some life back into it. This patch had four different curves to it took some time just to make.

Next of the patches. I wanted to get the nose of the tank to sit a little lower. You can see my pie cut to achieve this. Lowering the tank however created some clearance problems with one of the bolt heads on the motor so I shortened up the bead on this side of the tank. I love the little mods you see on bikes and cars that 99.9% of people would never notice until you parked it next to a stocker.


Next up. Eliminating where the original tank mounts were mounted. 


After some hammer welding.

When I tore a part the tank the inside was covered with rust after years of neglect. I got rid of a lot of this with a wire wheel. I then let it soak in a molasses bath(1 part molasses/5 parts water). It cleaned it up really well and I definitely recommend it. I will line the tank with a tank liner so the rust won't come back.


Welded up. You can see how the bead on the right is about 2" shorter than stock and the new mounts.

Mounted up

During the surgery I lowered the tunnel about 3/8" and took about another 1/4" off the bottom of the tank to get it to look "right" in my eyes.


Still playing with ride height.

Lowered 2.25"